
Setup Windows for HTML, CSS, Javascript Web Development with Astro
Welcome to the world of web development! If you're just getting started and looking to set up a development environment on your Windows 10 or 11 machine, you're in the right place.
In this guide, we'll help you get everything set up and running so you can start building your own web projects using HTML, CSS, and JavaScript with Astro. Astro is a modern static site builder that uses web standards like HTML, CSS, and JavaScript to build fast, modern, and scalable websites. Learning to use it will give you a strong foundation for your web development journey.
Don't worry if you're not familiar with these technologies – we'll explain everything you need to know as we go along. We know that setting up a development environment can seem challenging at first, but with a little bit of patience and some basic computer skills, you'll be up and running in no time.
So, let's get started!
1. Install node.js
Node.js is a JavaScript runtime environment that allows developers to create server-side applications and run JavaScript code on the server. It is an open-source platform that is used to build fast and scalable server-side and networking applications.
To install it, go to the official Node.js website https://nodejs.org/en in your browser and choose the LTS version or the latest version (current) of Node.js for windows. Once downloaded, open NodeJS installer without disturbing other settings, click on the Next button until it’s completely installed.
After downloading, open the PowerShell by searching it in your applications and type node -v and hit enter
node -v
The node -v command is used to display the version number of the Node.js runtime installed on your machine.
(*) If the command doesn’t work after installation, close and restart PowerShell.
2. Install Yarn
Yarn is a package manager that is similar to npm, but it is faster and more reliable. To install it, open a PowerShell and type the following command:
npm install -g yarn
This will install yarn globally on your machine. Once downloaded, type the following command to check the version installed:
yarn -v
(*) If you’re encountering an error related to setting a policy when trying to install packages in yarn, it’s likely that your system’s policy prevents running scripts from unknown sources. Yarn uses scripts to execute certain commands during the package installation process, so this can cause issues.

(*)To fix this error, you need to change the execution policy for PowerShell to RemoteSigned. Here are the steps to follow:
- Open PowerShell as an Administrator by searching the PowerShell in your computer then right click on it and choose run as administrator.
- Run the following command:
Set-ExecutionPolicy RemoteSigned
- When prompted, type “Y” to confirm the change.
- Close the PowerShell as administrator and open the Powershell by searching it in your computer
- Try running the command yarn -v again. It should work now.
yarn -v

3. Install Git
Git is a version control system that helps developers manage and keep track of changes to their source code. It allows them to easily collaborate on projects and keep a history of the changes that have been made.
To install Git, check first the system type of your computer, 32-bit or 64-bit.
Here’s a step you can follow to check the version of your computer.
- Search in your computer the About and select open
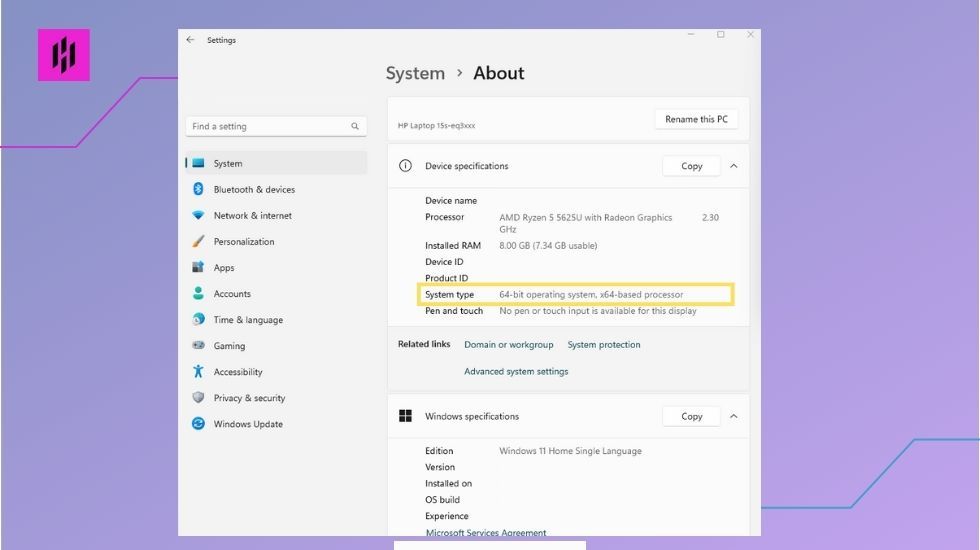
- Check the system type of your computer in the Device specifications.
Once system type is checked, go to https://git-scm.com/download/win , choose a standalone installer that fits your system type.
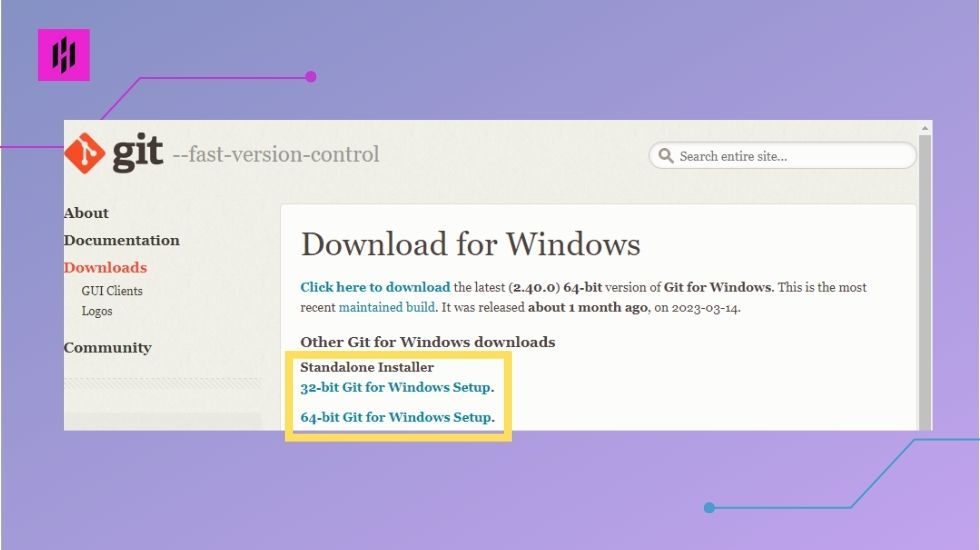
Once downloaded, open Git installer without disturbing other settings, click on the Next button until it’s completely installed.
4. Install Visual Studio Code
Visual Studio Code is a powerful and lightweight code editor that's perfect for web development. It's free and open source, and it comes with a ton of useful features that make coding a breeze.
To download Visual Studio Code, go to the official website: https://code.visualstudio.com/Download and choose the version for Windows and download it.
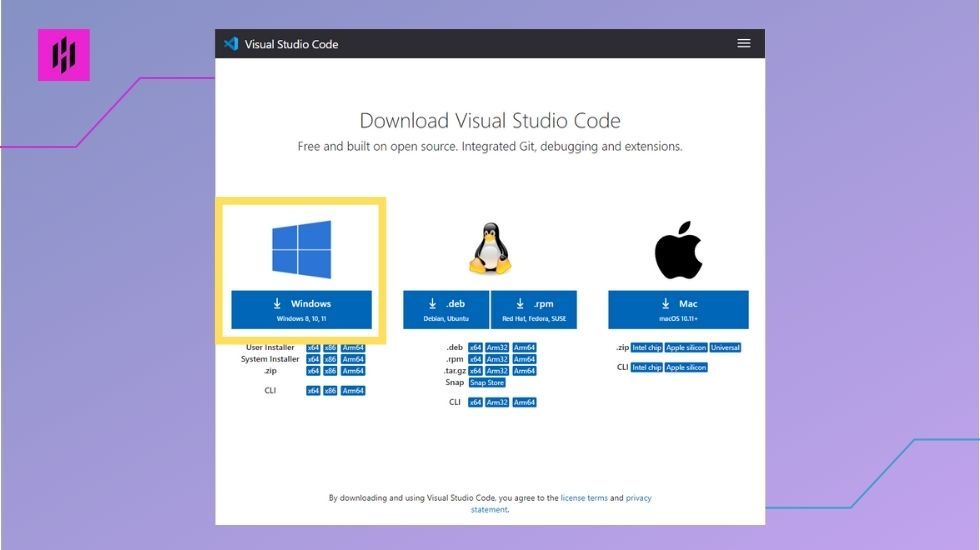
Once downloaded, open the Visual Studio Code installer without changing other settings and click on the “Next” button until it’s completely installed.
5. Create a folder where you can put code projects
First, create a folder where you can put all your codes. On the PowerShell, type mkdir “name of your folder” then enter
Example command:
mkdir Developer
The mkdir command is used to create a new directory (also known as a "folder") on your computer.
Next type cd “name of your folder” then enter, to get into your folder
Example command:
cd Developer
The cd command is used to change the current directory, which is the directory that you are currently working in.
6. Create a new Astro project
To create a new Astro project, type ‘yarn create astro’ command.
yarn create astro
Once prompted, type in your astro project folder name and hit enter. Note: “astro project folder name” is your custom folder name for your astro project.
Example astro project name:
./course

Then select “empty” by clicking the down arrow in your keyboard then hit enter.


And choose “Yes” to install dependencies and hit enter.


Choose “No” for TypeScript by clicking the right arrow in your keyboard and then hit enter.


Choose “No” for git repository init by clicking the right arrow in your keyboard and then hit enter.


Once the folder is created, type in the command cd ‘name of your astro project’ to go in your astro directory
cd course
and then type ‘code .’ to open the project folder in Visual Studio Code.
code .

(*) If code . is not performing its command by opening the Visual Studio code,follow these steps:
- Restart your PowerShell by closing and opening it again.
- Check if you are in your astro project’s folder, if not, go to your project folder using the cd command
cd Developer/course
- Once you are in your project folder, run the code . command again and hit enter, this will now open your Visual Studio Code.
code .
7. Must-have Plugins for Visual Studio Code
Once Visual Studio Code is open, install the Astro extension. From the left sidebar, select the Extensions icon, type “Astro” in the search bar and press Enter. The Astro extension should show up in the search result. Click on the install button to add the extension.

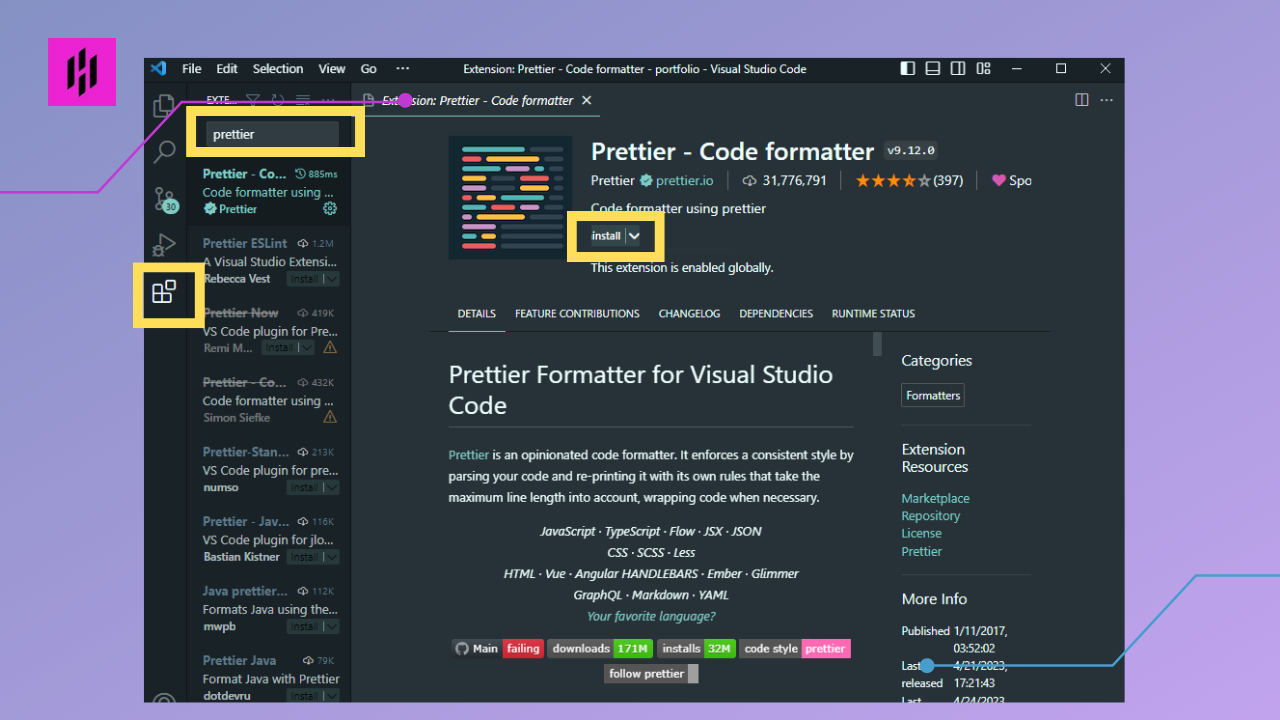
8. Installing Extension and Setting Up Auto Save in Visual Studio Code
To install ‘Prettier’, type in “Prettier” in the search bar and then click the Install button. You can select it also as your default formatter and set format on save.
Setting Up Default Formatter to Prettier
To set up Prettier as your default formatter, open the Preferences pane by clicking the File menu in the top of the page and then click preferences, then settings.
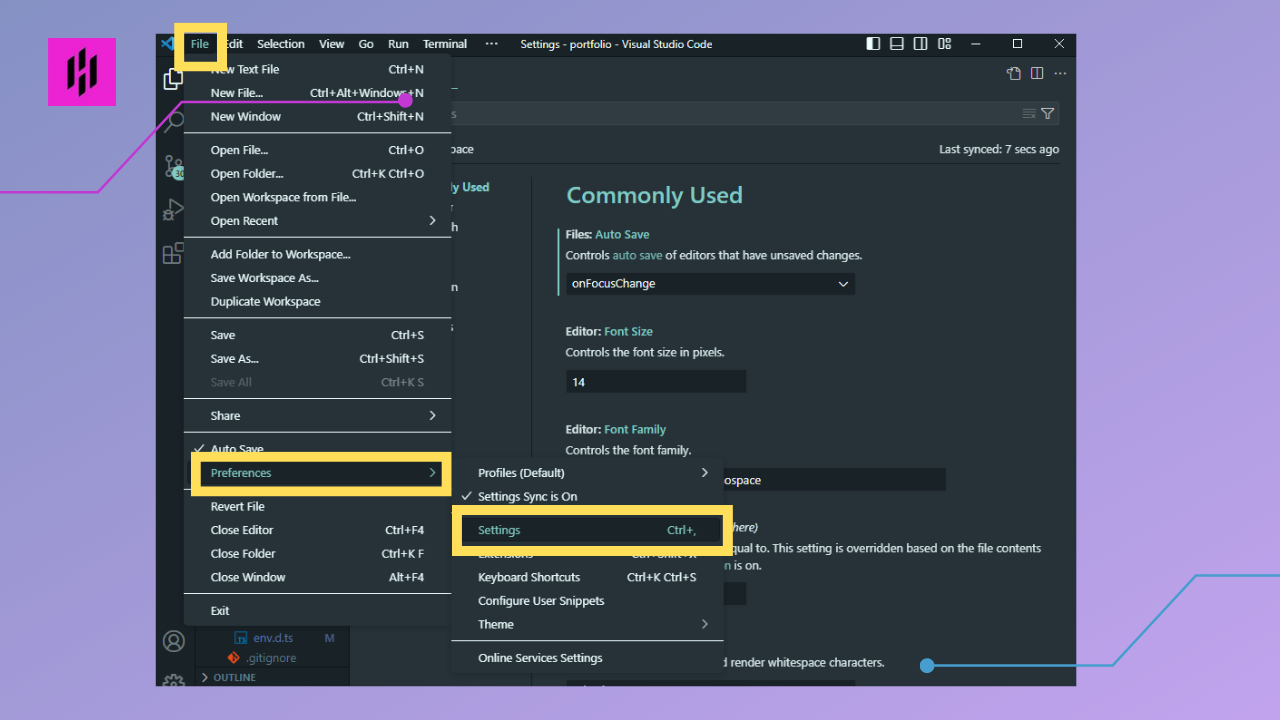
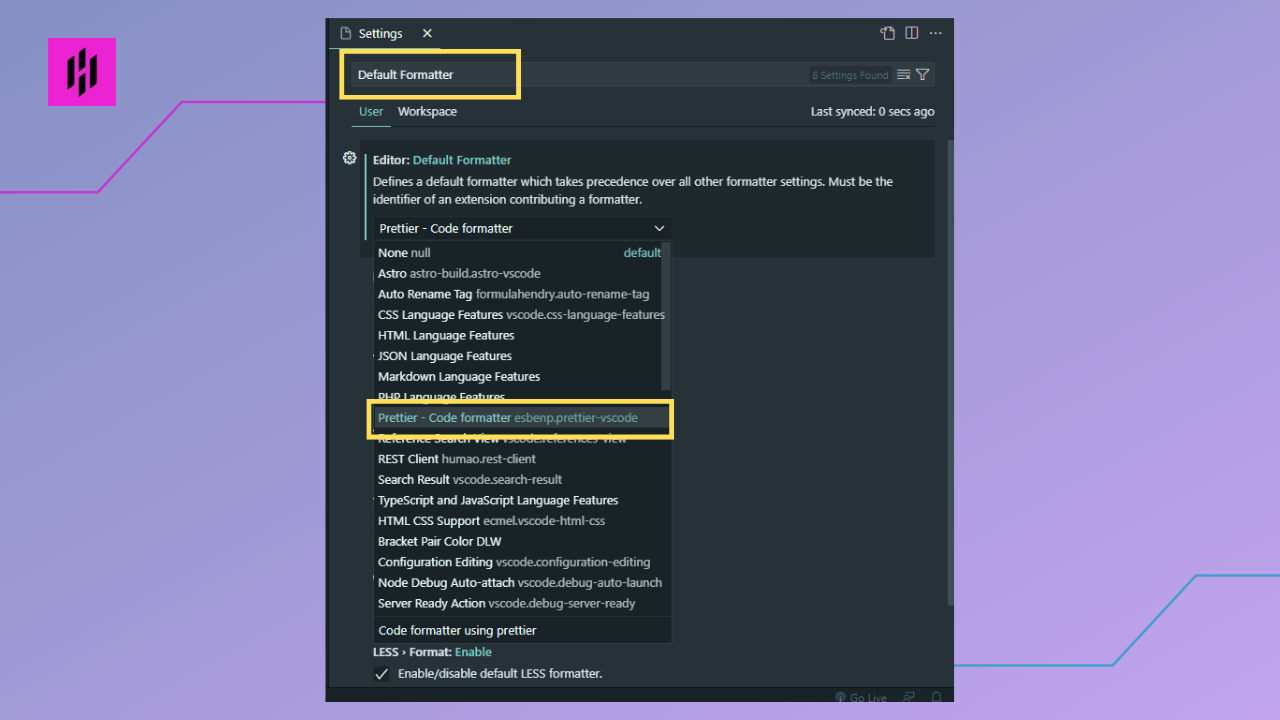
Once you are in the Setting, type Default Formatter in the search bar and select Prettier - Code formatter.
Setting Up Autosave
Autosave is a great feature that can help you avoid losing your work if your computer crashes or you lose power. To set up autosave in Visual Studio Code, open the Preferences pane by clicking the File menu in the top of the page and then click preferences, then settings. You can also do this by pressing Ctrl+.
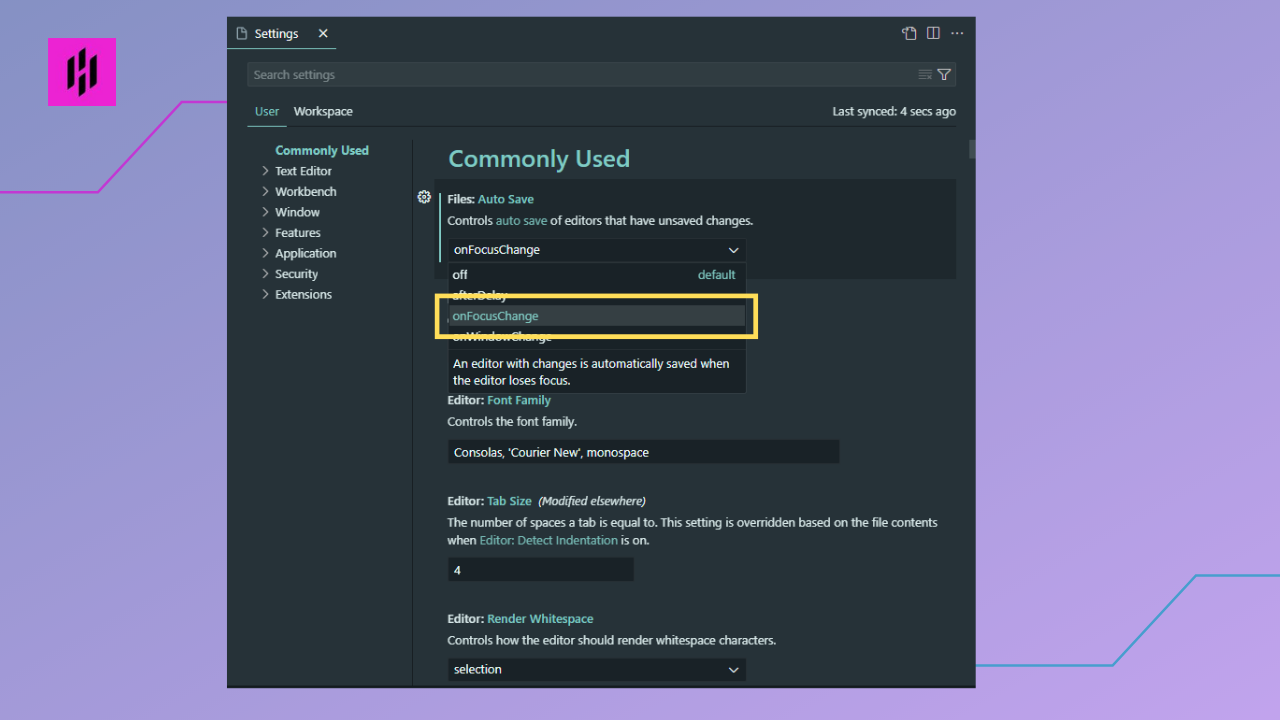
In the settings, change the Auto Save to onFocusChange
9. Adding License in package.json
Adding a license in the ‘package.json’ file will specify the terms of use for your software. This is important because it helps to protect your intellectual property and ensure that your software is used in a way that you are comfortable with.
To add it, go back to your project folder by clicking the explorer icon at the left side bar of your Visual Studio Code and select the package.json file.

Open the ‘package.json’ file in your project and type the license below, under the version. Check your license requirements as needed.
Sample license:
"license": "0BSD",

Next is to add a ‘LICENSE’ file in your astro project folder by clicking the File menu at the top bar and choose ‘New File’. Type in ‘LICENSE’ and hit enter.

Once the license file is created, copy the license clause below and paste it in the license file.
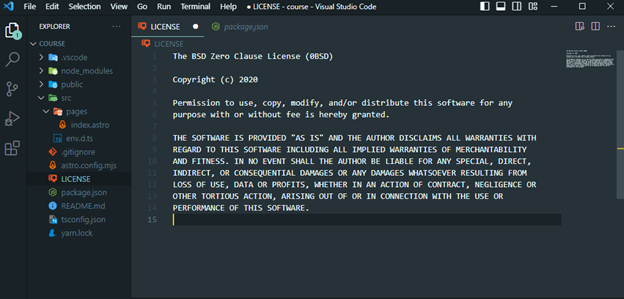
The BSD Zero Clause License (0BSD)

Copyright (c) 2020

Permission to use, copy, modify, and/or distribute this software for any
purpose with or without fee is hereby granted.

THE SOFTWARE IS PROVIDED "AS IS" AND THE AUTHOR DISCLAIMS ALL WARRANTIES WITH
REGARD TO THIS SOFTWARE INCLUDING ALL IMPLIED WARRANTIES OF MERCHANTABILITY
AND FITNESS. IN NO EVENT SHALL THE AUTHOR BE LIABLE FOR ANY SPECIAL, DIRECT,
INDIRECT, OR CONSEQUENTIAL DAMAGES OR ANY DAMAGES WHATSOEVER RESULTING FROM
LOSS OF USE, DATA OR PROFITS, WHETHER IN AN ACTION OF CONTRACT, NEGLIGENCE OR
OTHER TORTIOUS ACTION, ARISING OUT OF OR IN CONNECTION WITH THE USE OR
PERFORMANCE OF THIS SOFTWARE.
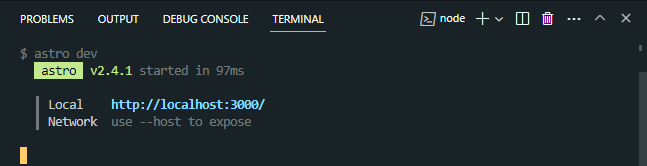
10. Start the Development Server
Lastly, to start the development server. Open terminal by clicking the terminal menu at the top bar and select ‘New Terminal’.

Once the terminal is open, type the command “yarn start”.
yarn start
This will give you a default link such as http://localhost:3000/ (or a different number, depending on your configuration). As you make changes to your code, the development server will automatically update the browser with the latest changes.

(*) If you encounter the error below, it means you need to change the setting of your execution policy.
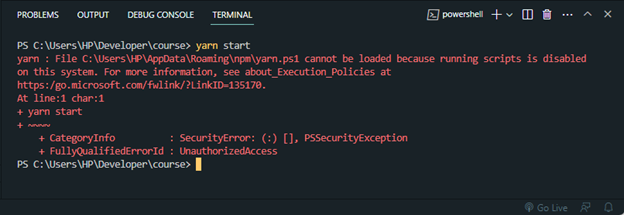
(*)To do this, follow these steps:
- Open PowerShell as an Administrator by searching the PowerShell in your computer then right click on it and choose run as administrator.
- Run the following command: ‘Set-ExecutionPolicy RemoteSigned’
Set-ExecutionPolicy RemoteSigned
-
When prompted, type “Y” to confirm the change.

-
After changing, go back to your Visual Studio Code and try running ‘yarn start’ again in its terminal. It should work now.
yarn start
Congratulations, you now have a basic project set up to start your web development journey!
Conclusion
We hope you found our guide helpful and that you are now ready to start building your own web development environment on Windows 10 or 11.
In our next article, we'll be focusing on the foundational elements of web development, such as layouts, components, headers, and footers. We'll be using Astro to build a basic website, but our primary emphasis will be on teaching you how to create and add these essential building blocks to your own projects.
So, make sure to stay tuned and keep an eye out for our next article!